Presentations
Reports
Poster Presentation
Individual Lab Reports
| Khush Agrawal | Dhruv Gupta | Shahram Syed | Sivvani Muthusamy | Sashank Undavalli |
| ILR01 | ILR01 | ILR01 | ILR01 | ILR01 |
| ILR02 | ILR02 | ILR02 | ILR02 | ILR02 |
| ILR03 | ILR03 | ILR03 | ILR03 | ILR03 |
| ILR04 | ILR04 | ILR04 | ILR04 | ILR04 |
| ILR05 | ILR05 | ILR05 | ILR05 | ILR05 |
| ILR06 | ILR06 | ILR06 | ILR06 | ILR06 |
| ILR07 | ILR07 | ILR07 | ILR07 | ILR07 |
| ILR08 | ILR08 | ILR08 | ILR08 | ILR08 |
| ILR09 | ILR09 | ILR09 | ILR09 | ILR09 |
| ILR10 | ILR10 | ILR10 | ILR10 | ILR10 |
Progress Reviews
- Progress Review 1
- Progress Review 2
- Progress Review 3
- Progress Review 4
- SVD
- Progress Review 7
- Progress Review 8
- Progress Review 9
- Progress Review 10
PCB:
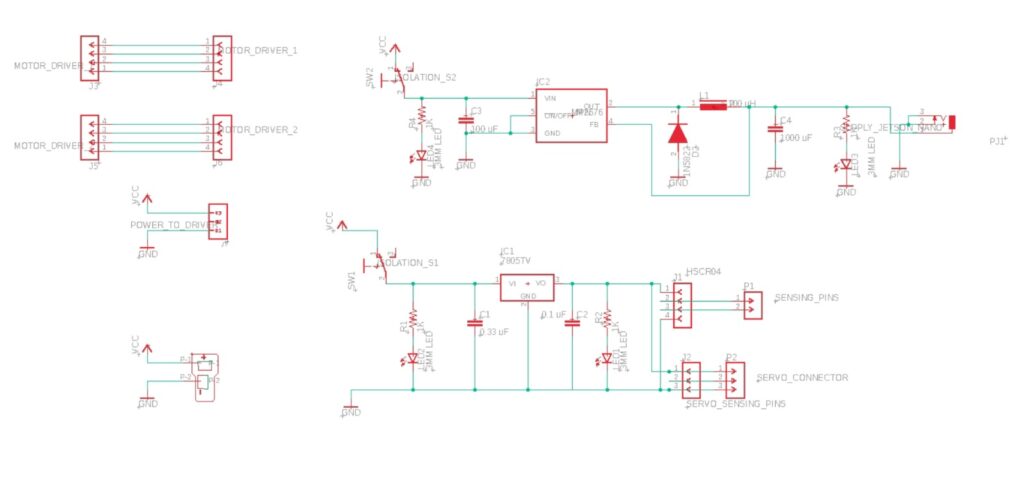
Schematic

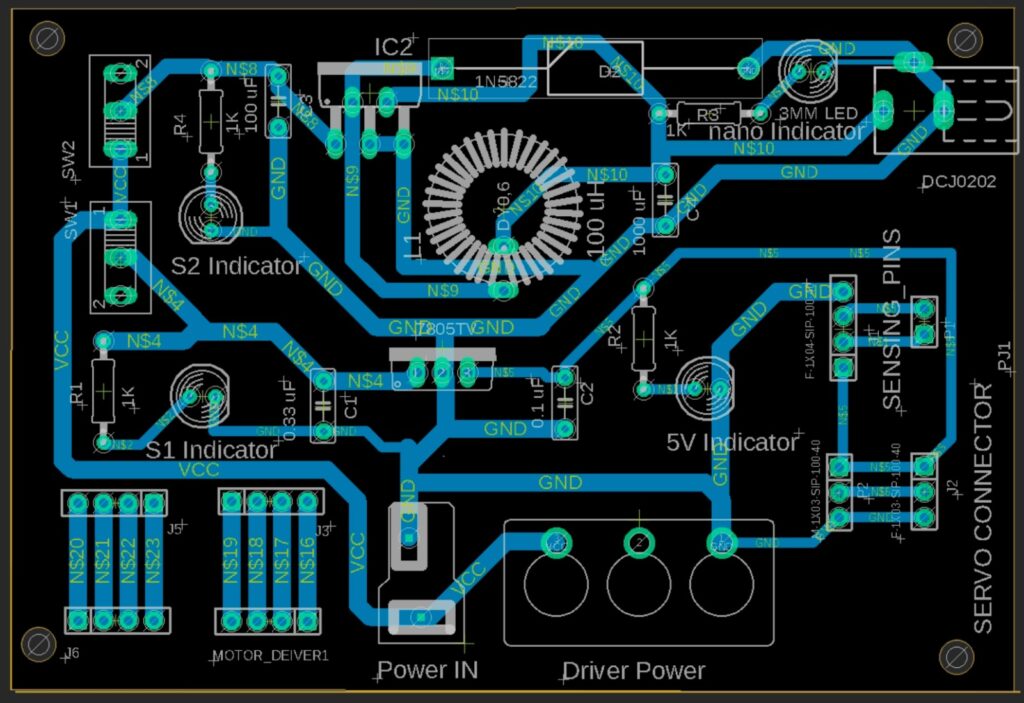
Board

BOM
| Value | designators | Description |
| 0.1 uF | C2 | 0.1 µF 50 V Aluminum Electrolytic Capacitors Radial, Can 2000 Hrs @ 85°C |
| 0.33 uF | C1 | 0.33 µF 50 V Aluminum Electrolytic Capacitors Radial, Can 1000 Hrs @ 105°C |
| 100 uF | C3 | 100 µF 50 V Aluminum Electrolytic Capacitors Radial, Can 7000 Hrs @ 105°C |
| 100 uH | L1 | uxcell Toroid Core Inductor Wire Wind Wound, 100uH, 34 m Ohm, 5A Coil |
| 1000 uF | C4 | 1000 µF 10 V Aluminum Electrolytic Capacitors Radial, Can 10000 Hrs @ 105°C |
| 1K | R1, R2, R3, R4 | 1 kOhms ±5% 1W Through Hole Resistor Axial Flame Retardant Coating, Safety Metal Oxide Film |
| 1N5828 | D2 | Diode 40 V 3A Through Hole Axial |
| 1X3.4DB | J7 | 1×3 Pin Header | Single Row Connector | 2.54mm Pitch |
| 3MM LED | LED1, LED2, LED3, LED4 | Green 568nm LED Indication – Discrete 2.2V Radial |
| 7805TV | IC1 | Linear Voltage Regulator IC Positive Fixed 1 Output 1.5A TO-220-3L |
| DCJ0202 | PJ1 | DC Power Connectors DC POWER JACK OD 2.00MM |
| F-1X03-SIP-100-40 | J2 | FEMALE HEADER SOCKET 3 PIN |
| F-1X04-SIP-100-40 | J1, J4, J6 | FEMALE HEADER SOCKET 4 PIN |
| Isolation S1 | SW1, SW2 | Slide Switch SPDT Through Hole, Right Angle |
| LM2596T | IC2 | Buck Switching Regulator IC Positive Adjustable 1.23V 1 Output 3A TO-220-5 |
| M-1X02-SIP-100-40 | P1 | 1×2 SINGLE ROW BREAKAWAY, HEADER .1″(2.54mm) SPACING, Straight (Vertical) Through Hole |
| M-1X03-SIP-100-40 | P2 | 1×3 SINGLE ROW BREAKAWAY, HEADER .1″(2.54mm) SPACING, Straight (Vertical) Through Hole |
| M-1X04-SIP-100-40 | J3, J5 | 1×4 SINGLE ROW BREAKAWAY, HEADER .1″(2.54mm) SPACING, Straight (Vertical) Through Hole |
| T-PLUG_CONNECTOR | PS1 | 2 Position Plug/Receptacle, Dean Connector Free Hanging (In-Line) |
Component Testing & Results
Ultrasonic Sensors
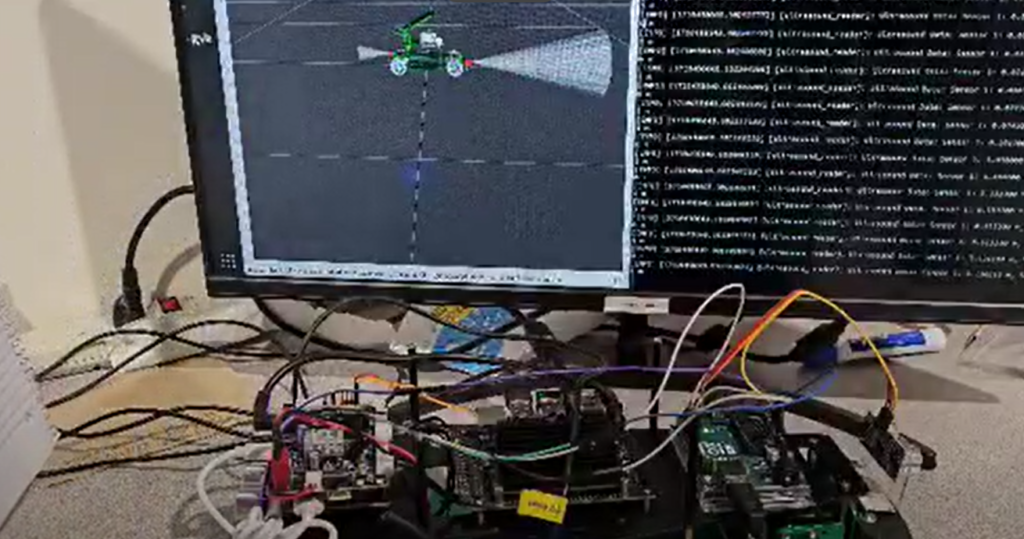
We have equipped our vehicle with four HC-SR04 ultrasonic sensors to gather proximity data about the car’s surroundings. Initially, our testing phase began with the integration of two sensors to establish a foundational setup. These initial sensors were connected to a Jetson Nano mounted on the vehicle. An Arduino microcontroller was employed as an intermediary to facilitate communication between the sensors and the Jetson Nano, handling the sensor data collection and preprocessing.
For visualization and real-time analysis of the sensor data, we utilized RViz. RViz allowed us to observe the sensor outputs in a dynamic, graphical format, which was crucial for assessing the accuracy and coverage of our sensor setup. After confirming the system’s functionality and reliability with two sensors, we expanded our setup to include four HC-SR04 sensors.

Software
This section describes how to prepare and use your computer for developing and demonstrating the developed system. It covers the setup process, including software installation, virtual environment configuration, and script execution using prewritten bash scripts. All the bash scripts can be found here: https://github.com/teamperciv/utils.
Prerequisites
- Linux OS with Bash shell
- Git and tmux installed
- Administrative privileges for package installation
- Conda environment manager installed
Scripts Breakdown
- env_vars.sh
This script initializes environment variables used across the setup and operation scripts.- USER_HOME: Resolves to the home directory of the current user.
- PERCIV_PYTHON_VERSION: Sets the Python interpreter version, e.g., “python3.8”.
- PERCIV_WS_PATH: Defines the path to the workspace directory.
- PERCIV_VENV_PATH: Specifies the path to the Python virtual environment.
- PERCIV_VENV_SOURCE_PATH: Points to the activation script of the virtual environment.
- setup_computer.sh
- Prompts the user to confirm if they want to proceed with the setup to avoid accidental modifications.
- Sources env_vars.sh to import environment variables.
- Verifies if the specified Python version is available.
- Installs Python, its virtual environment capabilities, and development headers using apt-get.
- Creates a new Python virtual environment and activates it.
- Installs required Python packages listed in requirements.txt and additional packages like catkin_pkg.
- Detects installed ROS versions (Foxy or Humble) and configures the environment accordingly.
- Creates a workspace directory, builds it using colcon, and sources the setup script.
- Clone Additional Repositories
- Clones necessary Git repositories into the workspace.
- start_bev.sh
- Sources env_vars.sh, detects the installed ROS version, and manages dual ROS versions (ROS 1 Noetic and ROS 2 Foxy/Humble).
- Initiates a tmux session, configures the environment, and runs multiple components required for BEV generation.
- Start_demo.sh
- Verifies the existence of the ROS setup path, the virtual environment, and the workspace directory.
- Sets up the shell environment by deactivating Conda, sourcing the virtual environment, ROS installation, and the workspace setup script.
- Starts a tmux session and sequentially configures panes to run various project components like controllers, safety checks, and visualization scripts.
- Manages layout and execution across tmux panes and windows, ensuring that all components are running simultaneously and can be monitored effectively.
- Executes the start_bev.sh script to run additional processes related to BEV generation.

